

The Logistics
Self-Paced Learning is instruction created in a manner that allows the learner to proceeds from one topic or segment to the next at their own speed. This required a backwards design model. I knew what I needed students to know and be able to do since I was able to pretest them on the topic. I set my self-paced lessons up via Schoology. Schoology is a learning management system (LMS) used to create, manage, and share content and/or resources.
This required lots of frontend planning as well as anticipation of possible problems that may a arise. The following class after the equations pre-assessment I individually told each student which level folder they would begin in.
 |
| These are my Leveled Folders in Schoology I set up for the self-paced learning. |

I created a spreadsheet with mastery check scores and a checklist of mastered levels. I used this spreadsheet to document dates that I met with students and to create small groups. During the small groups I met with a minimum of 2 students and a maximum of 3 students. Students are also able to come to me with any questions they may have during class.
 |
| This is my handmade spreadsheet with topics and progress. I highlighted the areas of need for each student. Ignore my typo, this photo is from my Insta-Stories. |
- Create the Assessment for the Focus Content Here is where you determine the learning targets and what you want your students to know and be able to do.
- Create a Guide or Checklist Test questions should be aligned with learning targets to help students identify areas of need. Students will know where to start depending upon your set up. Will students navigate on their own or will you assigned them to particular activities or levels?
- Give Students the Pre-Assessment Students must know where they are going to decide what needs to be done to get to the final destination. Student will use the pre-assessment results to identify leaning target they have not yet mastered. #thepowerofYET
- Provide the tools needed for the Self-Paced Learning How will the students master those learning targets? What materials do they need to be successful? How much time will you give? How will you facilitate?


Schoology is an excellent tool that I had to get used to. I teach on a 7th grade team of one-to-one iPads. Schoology allows me to load everything online for student access, follow their progress, and assign items individually or by groups. With me using self-paced learning, my favorite feature is the tracking student progress.
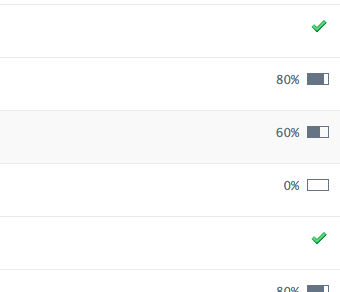 |
| This is the view of my Student Progress tab. I can see if students have or have not began and approximately how far that have made progress. |
Other Ways to Implement
Self-Paced Learning is a wonderful way to differentiate while being about to work with students individually based on student needs. Although I use Schoology and have one-to-one iPads there are many ways this can be implemented in different classrooms.
- Using a different LMS like Edmodo, Moodle, Beacon Live, etc.
- Using Google Classroom
- Using teacher created packets for each learning target
- Using stations with a combination of packets and technology
- Using Thinglink
- Using EdPuzzle
- Using Blendspace
Student Feedback
I am big on feedback about everything that I do but I especially love feedback from my students because my choices have the largest impact on them. I chose to try Self-Pace Learning with my Advanced class for many reasons but mostly because a majority of them are self-motivated and less dependent on me. I have 24 students total in my Advanced class but 21 students completed my 6 question survey. The survey was completely anonymous so that they could be honest.


The last question was not required do I'll pull the few who responded.
Other comments:
- It was fun and amazing
- It’s fun when you know you are learning what you need know, but you don’t communicate as much.
- Maybe make it like a game to motivate us.
- Thank you for this self paced time.
- Keep it Up!
- No ma’am. Thank you for the private lessons.

Overall, most of my students are liking Self-Paced Learning and I have 1 student who absolutely hates it. Part of me would like to connect with that student to help them adjust but I don't want to single students out. Let me know if you've every implemented Self-Paced Learning in your classroom. What ideas can you add to the list?
Until Next Time,

This is one awesome blog article.Really looking forward to read more. Really Great.
ReplyDeleteGo Language training
Hibernate online training
Hibernate training
Hyperion ESS Base online training
Hyperion ESS Base training
Hyperion Fdqm online training
Hyperion Fdqm training
Hyperion Financial Management online training
Hyperion Financial Management training
online training
ReplyDeleteLeaderJam’s is one of the best cohort-based courses online provider. There are a variety of reasons why leaders may want to take a cohort-based course, including gaining new skills, networking with other leaders, and building a community of like-minded individuals.
ReplyDelete